SolSwitch Connect - iPhone
User Guide
Tap the SolSwitch Connect (SSC) icon. The SolSwitch Connect login screen appears.
Logging onto SolSwitch Connect
Use the credentials provided to log onto SolSwitch Connect. The toggles at the login screen let you decide if you want to be logged in automatically and if you would like your password remembered.

After logging onto SolSwitch Connect for the first time, you will be asked to allow the application to access:
- Contacts: We will not upload your contacts to any server, but we do need access so that we can call phone numbers directly from SolSwitch Connect.
- Microphone: SolSwitch Connect needs microphone for calls.
- Camera: SolSwitch Connect needs the camera for video calls.
- Siri: Allows SolSwitch Connect to integrate with Siri. Note: Some of your SolSwitch Connect data will need to be sent to Apple to process your requests.
- Notifications: Notifications may include alerts, sounds, and icon badges. These can be configured in "Settings".
- Use Touch ID for SS Connect (if applicable): Enabling Touch ID allows you to use the iOS device biometric authentication support to securely access SolSwitch Connect. Note that any Touch ID profiles will be able to login to your SolSwitch Connect account. As such, do not store Touch ID profiles other than your own on this device.
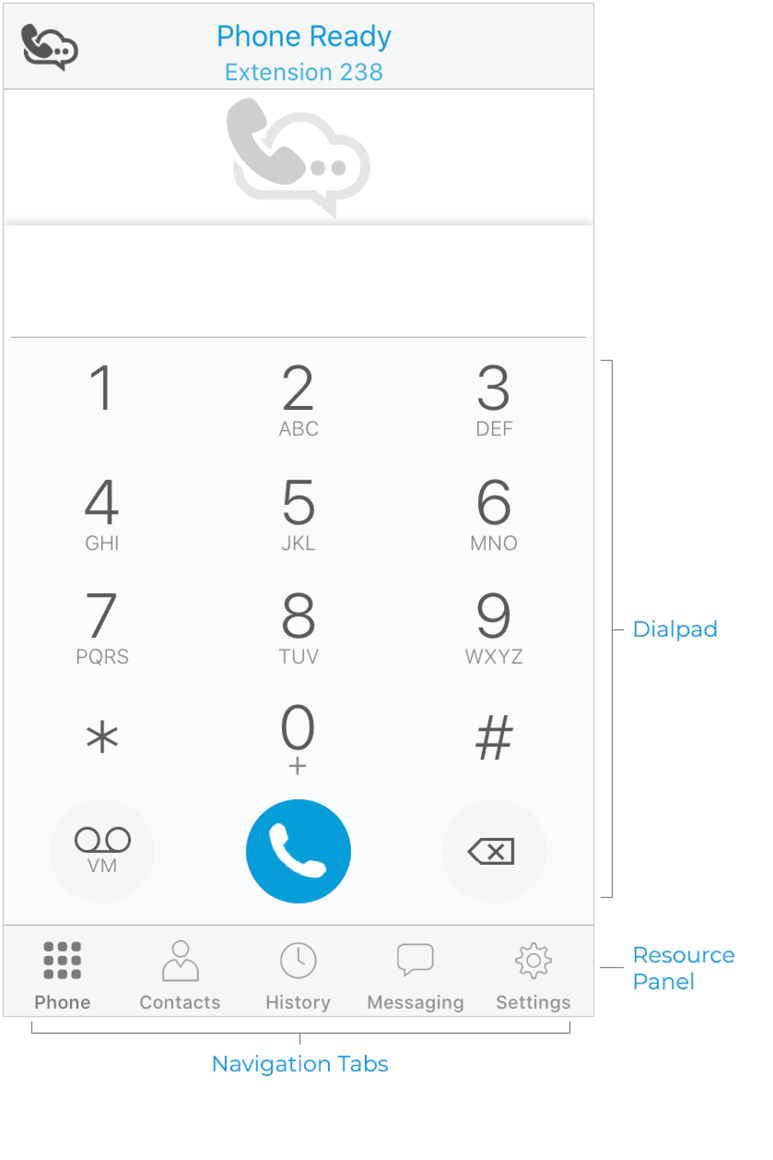
Navigating the SolSwitch Connect Interface
To navigate, use the tabs on the resource panel.
SolSwitch Connect allows you to share your online status and phone presence with Buddies. When you launch SolSwitch Connect, your online status is Available.
You can also view the status and presence of your Buddies.
Status Indicators and What They Mean
|
Icon |
Presence |
Definition |
|
|
Available |
People can call you and send you an IM. If no custom status note is specified, SolSwitch Connect automatically switches Available to On the Phone when you make or receive calls. |
|
|
Away |
People can call you and send you an IM. |
|
|
Busy |
People can call you and send you an IM. |
|
|
On The Phone |
When you make or receive phone calls, SolSwitch Connect automatically updates your status to On The Phone if your status is Available and no custom note is specified. When your call finishes, your status goes back to Available. While you are on the phone, you can still send and receive IMs. |
|
|
Do Not Disturb (DND) |
No one can call you; the call fails and your History shows a missed call. Buddies can send you IM; an alert comes up on the Messaging tab without any sound. |
|
|
Appear Offline |
You can see the presence status of your Buddies but your Buddies see you as offline. You receive phone calls and IMs if your Buddies do contact you; they are unlikely to do so because your Buddies cannot tell the different between Appear Offline and you really being offline. |
|
Any |
Custom Note |
You can choose any of the other status options. Your buddies see the status icon with your custom status note. |


You can change your status from Available to Away, Busy, On the Phone, Do Not Disturb, or Appear Offline. When you change your status from Available or specify a custom status note, your status remains as specified until you update it yourself.
SolSwitch Connect updates your status to On the Phone when you make or receive a phone call if your status is Available and you have not entered anything in Custom Notes.
To change your presence
- Go to the "Messaging" tab on the resource panel.
- Tap on your status. The list of available status options appears in "Presence Status".
- Tap the status option you want to use.
- Tap "Done".
SolSwitch Connect updates your status.
To create or delete a custom status note
You can create a custom status that appears beside the status icon. When you have a custom status note, SolSwitch Connect no longer automatically updates your presence to On the Phone if you have an incoming call.
- Go to the "Messaging" tab on the resource panel.
Tap on your status. The list of available status options appears in Presence Status.
- Type your custom status in Custom Note.
- Tap "Done".
SolSwitch Connect updates the text in your status to your Custom Note. You can choose any of the status options available. Your buddies see the wording from Custom Note and the status icon from the status you choose.
SolSwitch Connect stores your contacts for you. These contacts may be contacts you have added using SolSwitch Connect, they can be contacts that are saved to your device, or they can be special SolSwitch Connect contacts known as Buddies.
SolSwitch Connect uses contacts saved on your device. SolSwitch Connect’s Contacts are continually synchronized with your native contacts. Addingt, modifying or deleting a contact from one list updates the other list. You must enable iCloud contact syncing by setting iOS Settings > Contacts > Default Account to iCloud for this feature to work properly.
When multiple entries are merged as one entry on iOS, modifying a contact within SolSwitch Connect updates all the contact sources. For example, if you have set up the contacts from iCloud and Exchange and link the three entries as one entry on iOS, you see one single contact on SolSwitch Connect with unified information from the three sources. Editing this contact on SolSwitch Connect also updates contacts on iCloud and Exchange. Use the native contacts app to update only one source, such as iCloud.
Buddies are contacts that share their online status with you using an XMPP or a softphone number. These are typically managed by your system administrator.
If you have contacts that you use frequently, you can add them as Favorites for quick and easy access.
In addition to seeing your device contacts in SolSwitch Connect, you can add additional contacts. These contacts are also added to your external contact sources.
To add a contact
- Go to the "Contacts" tab on the resource panel.
- Tap [+] Add.
- Complete the contact details you want to include and tap "Save".
The contact is added to SolSwitch Connect’s contacts and to the device’s native contacts.
To edit a contact
- Go to the "Contacts" tab on the resource panel.
- Select the contact you want to edit by tapping on the contact or typing their name in the search bar and tapping on the contact. "Contact Details" opens.
- Tap "Edit".
- Complete the contact details and tap "Save".
The contact is updated in SolSwitch Connect and in the device’s native contacts.
To delete a contact
- Go to the "Contacts" tab on the resource panel.
- Swipe left on the contact to be deleted.
- Tap "Delete" then tap "Delete Contact".
Adding or editing a contact’s avatar
- From the resource panel’s "Contacts" tab, select the contact you want to edit by tapping on the contact. "Contact Details" opens.
- Tap "Edit".
- Tap on the empty avatar or tap the avatar you want to replace and select "Take Photo" or "Choose Photo". If you tap "Take Photo", the camera opens to take a picture. If you tap "Choose Photo", select an image on your device to use as the avatar.
- Tap "Save."
Favourites allow you easy, one-touch access to contacts you use frequently. Choose a contact’s phone number as a favourite for quick access to dial and to send IMs.
To add a favourite
- Go to the "Contacts" tab on the resource panel.
- Tap "Favourites" and tap [+] Add.
- Select the contact you want to add to your Favourites.
- Tap the phone number you want to add to your Favourites. If you want to add more than one number for the contact, repeat the process and select the next number.
SolSwitch Connect adds the contact to your Favourites list. In contact details, you can identify numbers that have been added to your Favourites by the star icon.
To reorder favourites
Favourites initially appear in the order that you add them. You can rearrange them in the order you want them to appear.
- Go to the "Contacts" tab on the resource panel.
- Tap "Favourites".
- Swipe right on the screen. The edit screen opens.
- Long press and draw Row reorder to move the favourite up or down in the list. Release Row reorder when the favourite is where you want it.
- Swipe left when you are finished.
To remove a favourite
Removing a Favourite contact will keep them in your Contacts list.
- Go to the Contacts tab on the resource panel.
- Tap "Favourites".
- Swipe the favourite to be deleted to the left.
- Tap "Delete".
You can use SolSwitch Connect to place and receive audio or video calls, as well as host a three-party audio conference call plus record, park, transfer and more!
You can place a voice or video call from almost any screen in SolSwitch Connect.
If you know the number, you can place a call using the dial pad. If you do not know a number, you can place the call from the Contacts screen, from the History screen or from a chat room. When enabled, you can also use Siri.
To place a call using the dial pad
- Go to the "Phone" tab on the resource panel.
- Type the number you want to call and tap "Dial".
SolSwitch Connect completes the voice call. You can add video to the call once the call is connected.
To place a call using SolSwitch Connect’s Contacts
- Go to the Contacts tab on the resource panel.
- Select a contact by tapping on the contact or typing their name in the Search bar and tapping on the contact. "Contact Details" opens.
- Tap the number you want to dial.
- Tap "Call…" or "Video…"
SolSwitch Connect starts the call. If you are placing a video call, SolSwitch Connect starts sending your video as soon as the other party accepts the incoming call.
To use redial
- Go to the "Phone" tab on the resource panel.
- Tap the "Dial" icon. The last number you dialled appears.
- Tap the "Dial" icon again.
SolSwitch Connect redials the last number called.
To add video to a call by swiping left
- Swipe left on the screen while on an active call.
SolSwitch Connect starts initializing video. You see the remote party’s video after they add video on their end.
To add video to a call using the More menu
- Tap [...] More and then tap "Start Video".
SolSwitch Connect starts initializing video. You see the remote party’s video after they add video on their end.
When a call is established, you can place that call on hold and make a second call.
To place a second call using the Dial Pad
- Tap the "Hold" button to put the first call on hold.
- Tap the "Add Call" button.
- Tap the "Phone" tab on the resource panel to display the dial pad, if necessary.
- Dial the number of the second party you want to call and tap the "Dial" button.
Ending one call automatically switches back to the other call.
Note: When you use "Add Call" from the lock screen, the "Add Call" opens the iOS native dialer. Tap SS Connect instead to open SolSwitch Connect - then use "Add Call".
To place a second call using the SolSwitch Connect contacts
- Tap the "Hold" button to put the first call on hold.
- Tap the "Add Call" button.
- Go to the "Contacts" tab on the resource panel to display Contacts.
- Select a contact by tapping on the contact or typing their name in the Search bar and tapping on the contact. "Contact Details" opens.
- Tap the number you want to dial.
- Tap "Call…" or "Video…"
SolSwitch Connect connects the second call. If you are placing a video call, SolSwitch Connect starts sending your video as soon as the other party accepts the incoming call. If you end one of the calls, SolSwitch Connect automatically switches back to the other call.
To swap between two established calls
With two calls established and the active call is displayed in SolSwitch Connect, you can swap between them.
- While on an active call, tap the "Swap Calls" button.
SolSwitch Connect places the first call on hold and connects to the second call. SolSwitch Connect will display the name of the remote party for the active call.
Note: The camera is not available when you are running SolSwitch Connect on an iPad in split view mode. Video is not sent and you see a Video Not Available icon on your video preview.
SolSwitch Connect can block any incoming calls with: No number, anonymous Caller ID, and/or any number on your block list.
You can add up to 20 phone numbers to your SolSwitch Connect call block list. Your Call History will show blocked calls.
To enable call blocking
- Go to the "Settings" tab on the resource panel.
- Go to Preferences – Incoming Call.
- Tap Call Blocking.
- Enable options and/or add phone numbers to block.
To add a phone number to the block list from History
- Go to the "History" tab on the resource panel
- Tap the info icon beside the entry to open the call details.
- Tap "Block…" in the call entry.
Incoming calls generally appear the same as a native iOS incoming call. SolSwitch Connect’s push notifications allows for users to receive calls even when SolSwitch Connect is in the background.
To respond to an incoming SolSwitch Connect call
- Tap the option you want to use:
a) Accept: SolSwitch Connect answers the incoming call.
b) Decline: SolSwitch Connect ends the incoming call.
c) Remind Me: SolSwitch Connect ends the incoming call and
sets a call reminder.
To answer an incoming call when the device is locked
- Slide the phone icon to the right to answer the call. Tap the iPhone and iPad power button or the volume buttons to silence the incoming ring tone without answering the call.
- To access any other call handling features, tap the SolSwitch Connect icon and, if required, enter the passcode for the device. To answer a second incoming SolSwitch Connect call
To answer a second incoming SolSwitch Connect call
- Tap the option you want to use:
a) End & Accept: SolSwitch Connect ends the first call and answers the incoming call.
b) Decline: SolSwitch Connect continues with the first call and ends the incoming call.
c) Hold & Accept: SolSwitch Connect puts the first call on hold and answers the incoming call.
d) Remind Me: SolSwitch Connect ends the call and sets a reminder.
Handling an Incoming Video Call
When the remote party places a video call, you see their video on SolSwitch Connect when you answer the call. You can add your video, remove your video but continue to receive video, or you can remove all video and downgrade the call to audio only.
On an iPhone, the video controls auto-hide. If the video controls are missing, tap the screen to make them reappear.
To send your video
- While on an active call, tap the Camera icon in the toolbar at the bottom of the screen.
SolSwitch Connect starts sending your video to the remote party.
To stop sending your video
Stop sending video but continue to receiving it (and/or audio).
- While on an active call, tap the Stop Camera icon in the toolbar at the bottom of the screen. Video stops sending to the remote party.
You can still see the remote party’s video if they are sending it.
To remove all video
You can remove all video from the call and turn it into an audio only call.
- Swipe right on the screen.
- Tap […] More.
- Tap "Stop Video".
SolSwitch Connect switches the call to an audio call.
Inbound calls can be parked (put on a public hold) by dialling: ##. Parking a call allows you or anotheruser to pick up the call from any other device on the phone system.
While on a call, simply press ##. This will place the call in the next available parking lot. The system will read back the parking lot number once the call is parked.
The call will then leave your phone and you can hang up the receiver. You could now advise the person who must answer the parked call that they have a call parked on "XX" (where XX represents the parking lot number where the call was parked).
Users need simply to dial the parking lot number in order to pick up the parked call.
Calls can be transferred in two ways. An attended transfer, where the first party speaks to the target before transferring the call or an unattended (blind) transfer, where the first party simply sends the call to the target without talking to them in advance.
When you transfer a video call, the call is transferred as an audio call. Both parties can then add video to the audio call.
To make an attended transfer using the Dial Pad
- Tap the "Hold" button to put the first call on hold.
- Tap the "Add Call" button.
- Enter the number you want to transfer the call to and tap "Dial."
- After speaking with the target, tap […] More then tap "Transfer".
SolSwitch Connect connects the target parties and disconnects you.
To make an attended transfer using SolSwitch Connect’s Contacts
- Tap the "Hold" button to put the first call on hold.
- Tap the "Add Call" button.
- If necessary, go to the Contacts" tab on the resource panel.
- Select a contact by tapping on the contact or typing their name in the search bar and tapping the contact. "Contact Details" opens.
- Tap the number you want to transfer the call to.
- Tap "Call…" or "Video…"
- When you are finished speaking to the target, tap the […] More button and tap "Transfer".
SolSwitch Connect connects the target parties and disconnects you.
To make an unattended (blind) transfer using the Dial Pad
- Tap the […] More button and tap "Transfer".
- If necessary, go to the "Phone" tab on the resource panel.
- Type the number you want to transfer to and tap "Transfer".
After tapping Transfer, SolSwitch Connect puts the remote party on hold while dialing the target. Once the call connects, SolSwitch Connect ends the call between you and the remote party. If the target answers the call, the call continues between the target and the remote party. If the target declines the call, the call ends.
To make an unattended (blind) transfer using the Contacts
- Tap the […] More button and tap "Transfer".
- Go to the "Contacts" tab on the resource panel to display the Contacts.
- Select a contact by tapping on the contact or typing their name in the Search bar and tapping the contact. Contact Details opens.
- Tap the number you want to transfer the call to.
- Tap Transfer to…
After tapping Transfer, SolSwitch Connect puts the remote party on hold while dialing the target. Once the call connects, SolSwitch Connect ends the call between you and the remote party. If the target answers the call, the call continues between the target and the remote party. If the target declines the call, the call ends.
When you have two calls established, you can merge the two calls into a three-way conference call. You can split the conference call back to two separate calls.
To merge two calls
You can merge two existing calls into a conference call. If either of the calls is a video call, you can still merge the calls but the merged call is an audio only call.
- With two active calls in progress, tap the "Merge" button.
SolSwitch Connect merges the two calls into a conference call and displays Conference. If you end the call, both remote parties are disconnected. The remote parties cannot continue the call without you.
To split merged calls
- With two calls merged, tap the Split button.
SolSwitch Connect splits the calls. On iPhone, SolSwitch Connect displays the name of the remote party for the active call.
All calls are captured in SolSwitch Connect’s Call History. Calls are also captured on iPhone’s call history when Settings > Preferences > Native Integration is on.
|
Icon |
Call Type |
|
|
Incoming call |
|
|
Outgoing call |
|
|
Incoming call recorded on this device |
|
|
Outgoing call recorded on this device |
|
|
Blocked call (appears when call blocking is enabled) |
|
|
Missed call |


History provides a basic list of calls which can be filtered by All or Missed. You can also view detailed information for an individual call.
Note: If your call was transferred, you see the Caller ID information for the last person you talked to, not the person you initially dialed.
To view history details
- Go to History tab on the resource panel.
- Tap the info icon on the entry to display the type of call, the date and time of the call, the length of the call, the account used for the call, and contact information about the caller.
To delete a single call using History details
- Go to the "History" tab on the resource panel.
- Swipe the call to be deleted to the left.
- Tap "Delete".
SolSwitch Connect deletes the call from the History.
To delete all calls
- Go to the "History" tab on the resource panel.
- Tap "Delete".
- Tap "Clear All Entries".
SolSwitch Connect deletes all the call from the History.
Tip regarding iPhone native history: When you have Settings > Preferences > Native Integration turned on, you can view and place SolSwitch Connect calls from the iPhone’s native call history. To place a SolSwitch Connect call from the iPhone’s native call history, tap on a SolSwitch Connect entry. SolSwitch Connect opens and places the call.
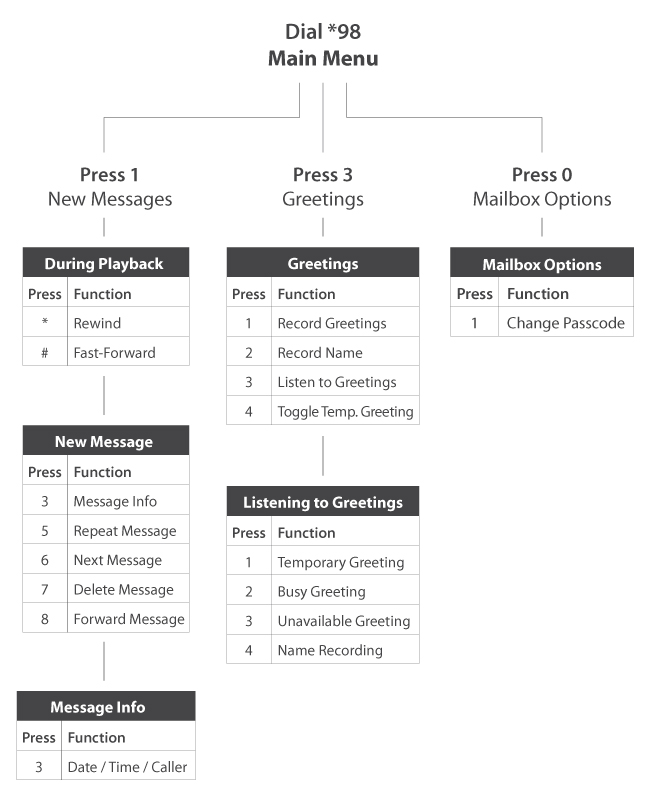
By default, your voicemail is set to answer after 5 rings. To access your voicemail, dial *98. To access another extensions voicemail, dial *98+Ext. To access your voicemail remotely, call your extension and press the * key when your voicemail answers.
When accessing your voicemail, you are prompted for a passocde. The default passcode is 1234. Once logged in, you can change your passcode by pressing 0 for Mailbox Options and then 1.
Sunwire offers the option for up to three different types of greetings.
Unavailable Greeting
To record your main Unavailable Greeting, from the voicemail’s main menu press 3 for Greetings then press 1 to Record a Greeting. Press 3 to record your Unavailable Greeting and follow the voice prompts.
Busy Greeting
If you would like a different greeting to be played when you are on the phone and your line is busy, you can record a Busy Greeting. From the main menu, press 3, 1, 2 to record your Busy Greeting.
Temporary Greeting
You can also setup a Temporary Greeting if you are going away but do not want to record over your existing greetings. Once enabled, the Temporary Greeting will always play until it is disabled.
To record a temporary greeting, press 3, 1, 1 from the main menu.
To toggle (enable/disable) your temporary greeting, press 3 then 4.
Instant messaging, text messaging and group chat.
There are three types of messages in SolSwitch Connect – instant messages (IMs), text messaging (SMS) and chat rooms.
- Instant Messages (IM) are messages that you send to an individual corporate contact or ‘Buddy’.
- Text Messages (SMS) when enabled, allows you to communicate with other devices over short message service using a designated business phone number.
- Chat Rooms have multiple members and allow you to send messages to all the members of the room.
To send instant messages
- Go to the "Messaging" tab on the resource panel.
- Tap "People" and tap "Compose".
- Tap "Add Recipient" or start typing the name of the contact you want to add to the IM.
- Tap a Buddy.
- Type your message in Compose Message and tap Send.
SolSwitch Connect sends the message.
To send an instant message from Contacts
- Go to the "Contacts" tab on the resource panel and tap "Buddies".
- Select a Buddy by tapping on the Buddy or typing their name in the search bar and tapping the Buddy. "Buddy Details" opens.
- Tap "Send Instant Message".
- Tap inside the message area, type your message and tap Send.
With SolSwitch Connect running, you can reply to an instant message (IM) from the foreground, background or the lock screen.
SolSwitch Connect displays the number of conversations (IMs and chat rooms) with new messages with a badge notification on the resource panel
To reply to an instant message in the foreground
- Go to the "Messaging" tab on the resource panel.
- Tap "People" and tap the IM session. The message and any previous messages in IM session open.
- Type your message in Compose Message and tap Send.
To reply to an instant message in the background
When SolSwitch Connect is in the background, you receive a notification that you have a new message and the number of messages shows on SolSwitch Connect’s icon.
- Tap the IM notification. SolSwitch Connect opens in the "Messaging" tab.
- Type your message in Compose Message and tap "Send".
Note: With the release of iOS 10.3 or higher, turn on Settings > Preferences – General > Improve Reachability. If you are still having problems, change Settings > Preferences – General > Reachability Strategy to Enhanced. Setting this to Enhanced may consume more battery life.
To reply to an instant message when the device is locked
When the device is locked, you receive a notification on the lock screen when you have a new IM.
- Slide the notification left to reply on the lock screen (sliding the notification to the right requires your passcode and opens the message in SolSwitch Connect).
- Tap "View" or "Clear". View allows you to respond to the message. Clear hides the notification.
- Type your reply and tap "Send".
To send an SMS
- Go to the "Messaging" tab on the resource panel.
- Tap "SMS" and tap "Compose".
- Tap "Add Recipient" or start typing the name of the contact you want to add to the IM.
- Tap on the contact you want to send the SMS to. "Contact Details" opens.
- Tap the PSTN number you want to send an SMS to.
- Add more recipients using the above method (optional).
- Type your message in Compose Message and tap "Send".
To send an SMS from Contacts
- Go to the "Messaging" tab on the resource panel.
- Select the contact you want to send an SMS to by tapping on the contact or typing their name in the Search bar and tapping on the contact. "Contact Details" opens.
- Tap the PSTN number you want to send an SMS to.
- Tap "SMS...".
- Type your message in Compose Message and tap "Send".
To delete a single instant message
- Go to the "Messaging" tab on the resource panel.
- Tap "People" and tap the IM session.
- Press-and-hold on the message you want to delete.
- Tap "Delete".
SolSwitch Connect deletes the message. There is NOT a warning before SolSwitch Connect deletes the message.
To delete multiple instant messages
- Go to the "Messaging" tab on the resource panel.
- Tap "People" and tap the IM session.
- Press-and-hold one of the messages you want to delete.
- Tap "More".
- Tap all other messages that you want to delete.
- Tap "Delete".
- Tap "Delete # Messages" to confirm you want to delete the selected messages.
To delete an IM session by swiping left
- Go to the "Messaging" tab on the resource panel.
- Tap "People".
- Swipe left on the session you want to delete and tap Delete.
SolSwitch Connect deletes the IM session.
Chat rooms are used when sending messages to multiple recipients. Chat rooms can be private or public. Private rooms can only be joined by invitation. Public rooms can be joined by anyone in your corporate group.
Chat room properties
Each chat room has a set of properties. Some are required and some are optional.
Required chat room properies
Room name: Each room must have a unique room name. Up to 40 characters long.
Room type: A room can be private or public. Private rooms are unlisted and can be joined by invitation only. Public rooms are displayed in the list of chat rooms that you can join.
Room owner: The name of the person that created the room.
Optional chat room properties
Members: The people you are inviting to the room or the people already in the room.
Description: Up to 140 characters long that can be edited by the room owner.
Topic: A brief description of what is currently being discussed in the group that can be edited by anyone. Up to 140 characters long.
All SolSwitch Connect users can create new private or public chat rooms. Private chat rooms can only be joined by an invitation from the Room Owner. Public chat rooms can be joined by anyone.
Chat rooms are assigned an avatar using the initials from Room Name. As you type in Room Name, the color of the avatar changes. The resulting color is assigned to the chat room. Room Name is case sensitive.
Creating a private chat room
You can create a private chat room from the Messaging tab. When you create a private chat room, you invite people to join the room.
- Go to the "Messaging" tab on the resource panel.
- Tap "Rooms" and tap "Add".
- Tap "Create Room".
- Type in a Room Name. If desired, type a Description and a Topic.
- Tap "Add Members"
- Tap on the Buddies you want to add to the chat room. A check mark appears on top of their avatar. Tap Done when you finish selecting buddies. Your buddies show in Members. If you want to remove someone from Members before you create the chat room, tap the round Delete icon then the square Delete button.
- If desired, set the Notifications for the chat room.
- Tap "Done".
The Members you invited are automatically added to the room. The chat room shows up in the Rooms section of the Messaging tab. The lock on the avatar for the room indicates this is a private chat room.
Creating a public chat room
You can create a private chat room from the "Messaging" tab.
- Go to the "Messaging" tab on the resource panel.
- Tap "Rooms" and tap "Add".
- Tap "Create Room".
- Toggle "Public" to on.
- Type in a Room Name. If desired, type a Description and a Topic.
- If desired, set the Notifications for the chat room.
- Tap "Done".
The chat room shows up in the Rooms section of the Messaging tab.
Joining a private chat room
In order to joint a private chat room, you have to be added as a member. You automatically join the room when the Room Owner invites you and the private room shows in the Rooms section of the Messages tab with a dot to indicate it is new. If you leave a private chat room and want to rejoin, you need to be invited to the room again.
Joining a public chat room
- Go to the "Messaging" tab on the resource panel.
- Tap "Rooms" and tap "Add".
- Tap "Join Room".
- Tap the public rooms you want to join and tap "Done". You can use search to look for a specific room.
SolSwitch Connect adds the public chat room to the Rooms in the Messaging tab.
After a room has been created, the Room Owner can change the Room Name and Description, add new members, and add a Topic to a room. Members can also change the Topic.
Changing the Room Name and Description
- Go to the "Messaging" tab on the resource panel.
- Tap "Rooms" and tap the chat room you want to edit.
- Tap "More".
- Tap "Room Settings".
- Tap "Edit".
- Type in a new Room Name or Description.
- Tap "Save".
Adding a topic to a room
- Go to the "Messaging" tab on the resource panel.
- Tap "Rooms" and tap the chat room you want to edit.
- Tap "More".
- Tap "Room Settings".
- Tap "Edit".
- Type in the Topic.
- Tap "Save".
SolSwitch Connect can notify you when there is a new message or when you have been mentioned in a chat room. You can change the way you are alerted using a combination of individual chat room notification settings and the following Preferences.
Preferences - Messages
- Alert Sound can be enabled or disabled.
- Alert Vibration can be enabled or disabled.
- Alert Text Tone lets you choose the sound you want to use for incoming messages.
Preferences - Mentions
- @Mention Sound can be enabled or disabled.
- @Mention Text Tone lets you choose the sound you want to use for new mentions.
Types of notifications
When you have a new message or mention, you may see the following depending on how you have configured Chat Room Notifications and Preferences.
- A badge notification on "Messaging" in the resource panel with SolSwitch Connect in the foreground.
- A badge notification on SolSwitch Connect while in the background.
- The device (except iPad) vibrating in the foreground, background, and on the lock screen.
- The Alert Text Tone is played in the foreground, background and on the lock screen.
- The @mention Text Tone is played in the foreground, background and on the lock screen.
- A badge notification on the chat room in Rooms.
Changing chat room notifications
- All New Messages: SolSwitch Connect notifies you if there is a new message or you have been mentioned in a chat room you are a member of.
- Mention (@): SolSwitch Connect notifies you if you are mentioned in a chat room you are a member of.
- Mute Room: SolSwitch Connect does not notify you that there is a new message or that you have been mentioned in a chat room you are a member of.
To change chat room notifications
- Go to the "Messaging" tab on the resource panel.
- Tap "Rooms" and tap the chat room.
- Tap "More".
- Tap "Room Settings".
- Tap "Notifications".
- To stop receiving any notification for the room, toggle Mute Room on. Otherwise, select either All New Messages or Mentions (@).
- Tap "Back".
SolSwitch Connect updates your notification preferences for the room.
If you want to get the attention of a room member, you can use mentions. The person that is mentioned sees an indicator beside the chat room in Rooms. The name of the person mentioned in the messages is highlighted.
To mention a person
- Go to the "Messaging" tab on the resource panel.
- Tap "Rooms" and tap the chat room.
- Type @ followed by the name of the person you want to mention in Compose Message. As you type, SolSwitch Connect offers suggestions. Select the name of the person from the list of suggestions.
- Type your message in Compose Message.
- Click "Send".
SolSwitch Connect sends the chat room message. The person mentioned in the message sees an indicator that they have been mentioned.
Tip: You can use @Everyone to send a mention to all members of a private chat room and all active members of a public chat room.
Members of a chat room can see who is in the room. Anyone in the chat room can invite new members to a public chat room. The members of a private chat room is controlled by the room owner.
To see who is in a room
As a member of a chat room, you can see who is in the room. Private chat rooms display everyone who is a member of the chat room along with their status. Public chat rooms display the room members that are currently online.
- Go to the "Messaging" tab on the resource panel.
- Tap "Rooms" and tap the chat room.
- Tap "More".
- Tap "Members".
The members list opens. Each member is displayed with their status.
To add new members to a private chat room
The room owner can see the Settings in the chat room header.
iPhone and iPad
- Go to the "Messaging" tab on the resource panel.
- Tap "Rooms" and tap the chat room.
- Tap "More".
- Tap "Members".
- Tap [+] Add.
- Tap on the Buddies you want to add to the chat room. A check mark appears on top of their avatar. Tap Done when finished.
SolSwitch Connect adds the Buddy to the chat room.
Leaving or Deleting a Chat Room
You can leave a private or public chat room without closing it if you are not the room owner. You may be removed from a private chat room by the room owner. If you are the room owner, you can delete a private or public chat room.
Tip: Before you leave or delete a room, you may want to copy important messages and paste them in another app.
To leave a chat room swiping left
- Go to the "Messaging" tab on the resource panel.
- Tap "Rooms".
- Swipe left on the chat room and tap "Leave".
To delete a chat room by swiping left
- Go to the "Messaging" tab on the resource panel.
- Tap "Rooms".
- Swipe left on the chat room and tap "Delete".
The room owner deletes a chat room
The room owner may delete a chat room that you are a member of. If this happens, the chat room remains in Rooms but is dimmed and shows a message that the room is closed when you open the room and shows Room not available in Compose Message.
To remove the chat room from Rooms, leave the room using one of the methods above. If you want to keep the message history, copy the messages and paste them to another app before leaving.
You can copy a single message or multiple messages in an IM or a chat room.
To copy a single instant message
- Go to the "Messaging" tab on the resource panel.
- Tap "People" and tap the IM session.
- Press-and-hold the message you want to copy.
- Tap "Copy".
SolSwitch Connect copies the selected message to the clipboard so you can paste the message in SolSwitch Connect or another app.
To copy multiple instant messages
- Go to the "Messaging" tab on the resource panel.
- Tap "People" and tap the IM session.
- Press-and-hold one of the messages you want to copy.
- Tap "More" then tap all other messages that you want to copy. A check mark shows up beside each selected message.
- Tap "Copy".
SolSwitch Connect copies the selected message to the clipboard so you can paste the message in SolSwitch Connect or another app.
To copy a single chat room message
- Go to the "Messaging" tab on the resource panel.
- Tap "Rooms" and tap the chat.
- Press-and-hold the message you want to copy.
- Tap "Copy".
SolSwitch Connect copies the selected message to the clipboard so you can paste the message in SolSwitch Connect or another app.
To copy multiple chat room messages
- Go to the "Messaging" tab on the resource panel.
- Tap "Rooms" and tap the chat room.
- Press-and-hold one of the messages you want to copy.
- Tap "More" then tap all other messages that you want to copy. A check mark shows up beside each selected message.
- Tap "Copy".
SolSwitch Connect copies the selected message to the clipboard so you can paste the message in SolSwitch Connect or another app.
You can forward a single or multiple messages in an IM or chat room.
To forward a single instant message or single chat room message
- Go to the "Messaging" tab on the resource panel.
- Tap "People" or "Rooms" and tap the IM session or chat room.
- Press-and-hold the message you want to forward.
- Tap "Forward".
- Tap [+] Add recipient or start typing the name of the contact you want to add to the IM.
- Tap a Buddy. SolSwitch Connect opens the Buddy and the message is in compose Message.
- Tap "Send".
With SolSwitch Connect, you can send and receive files from a one-on-one instant message. The receiver must accept the files for the transfer to start. If you send more than one file at a time, the receiver must accept or decline all of the files for the transfer to start.
Prerequisites
• An XMPP (chat) account must be enabled
• The XMPP file transfer feature must be enabled
Limitations
The known limitations for file sharing are:
• File sharing does not work on group chats.
• You can only send multiple files at the same time if they are located in the same folder.
• If you are using more than one SolSwitch Connect client with your XMPP account, the files are not synced between your devices.
Send single files or files located in the same folder in an IM conversation.
To send a single photo, video or file.
- Create an IM or open a chat with the contact you want to share with.
- Tap "Attach"
- Locate the folder that contains the files that you want to send.
- Tap on the file you want to send.
A file transfer notification is sent to the recipient. Until the recipient responds to the notifications, the sender sees "Waiting...".
Once the recipient accepts the file, SolSwitch Connect shows the progress of the transfer and when the transfer is complete.
If the recipient declines the files, the transfer shows as Transfer Declined.
To send multiple images
- Create a new IM or open an IM conversation with the person you want to share the file with.
- Tap "Attach".
- Tap "Photo or Video". The file manager opens.
- Locate the folder that contains the files that you want to send. You can only send multiple files at one time if they are located in the same folder.
- Tap the photos and videos you want to send. Tap "Done" when you have selected all the photos and videos.
A file transfer notification is sent to the recipient. Until the recipient responds to the notifications, the sender sees "Waiting...".
Once the recipient accepts the file, SolSwitch Connect shows the progress of the transfer and when the transfer is complete.
If the recipient declines the files, the transfer shows as Transfer Declined.
To send multiple files
- Create a new IM or open an IM conversation with the person you want to share the file with.
- Tap "Attach".
- Tap "’File". The file manager opens.
- Locate the folder that contains the files that you want to send. You can only send multiple files at one time if they are located in the same folder.
- Tap "Select" and tap the files you want to send.
- Tap "Open" when you have selected all the files.
A file transfer notification is sent to the recipient. Until the recipient responds to the notifications, the sender sees "Waiting...".
Once the recipient accepts the file, SolSwitch Connect shows the progress of the transfer and when the transfer is complete. If the recipient declines the files, the transfer shows as Transfer Declined.
If you have an XMPP (chat) account enabled, another person with an XMPP account can send you files. The file transfer notification shows in the Messaging tab with SolSwitch Connect in the foreground and in a notification if SolSwitch Connect is in the background.
To receive a file transfer with SolSwitch Connect in the foreground
- Open the IM conversation in the Messaging tab.
- Tap "Accept" or "Decline" on the files. The file transfer does not begin until you have clicked Accept.
If you accept the file, SolSwitch Connect begins the transfer. If you decline the transfer, both the recipient and the sender see the file transfer status as Declined.
To receive file transfers with SolSwitch Connect in the background
- Tap on the incoming notification to open the "Messaging" tab.
- Tap on the IM with the new message indicator.
- Tap "Accept" or "Decline". If there are multiple files, the file transfer does not begin until you Accept or Decline all of the files.
If you accept the file, SolSwitch Connect begins the transfer. If you decline the transfer, both the recipient and the sender see the file transfer status as Declined.
You can cancel a file transfer as either the sender or the receiver. As the sender, you can cancel the transfer before the receiver accepts the transfer (your screen shows Waiting) or while the transfer has been accepted but before it completes.
Note: Once the file transfer has been accepted by the recipient, the progress screen may be too quick to actually see the progress.
To cancel an outgoing transfer using Cancel
- While the IM displays the progress bar, tap "Cancel".
The file transfer is cancelled. The sender sees "Transfer Failed" and the recipient sees "Transfer Declined" as the transfer status.
To cancel an outgoing transfer using press-and-hold
- Press-and-hold on the file while it is in the waiting stages or while it is in progress.
- Tap "Delete".
The file transfer is cancelled. The file transfer is deleted from the sender’s IM.
To cancel an incoming transfer
- Tap "Cancel" on a file transfer that is in progress.
The file transfer is cancelled. The recipient and the sender see "Transfer Failed" as the transfer status.
Note: If you put SolSwitch Connect in the background during a file transfer, the transfer is paused until you bring SolSwitch Connect back to the foreground.
On the Settings tab of the resource panel, you can find:
- Accounts: Used to setup your SIP, SMS and XMPP accounts. These accounts are controlled by your system administrator.
- Preferences: User defined preferences for how the end user wants SolSwitch Connect to work. See below for more details.
- Advanced Settings: Settings that apply to SolSwitch Connect overall, rather than just to individual SIP, SMS and XMPP accounts. We recommend not modifying these settings unless told to by a certified SolSwitch Connect support representative.
- About: Information about SolSwitch Connect.
Preferences
Go Settings > Preferences to make changes to the following fields.
Mobile Data Network
|
Field |
Description |
|
Mobile Data Network |
|
|
Allow VoIP Calls |
Appears when Use When Available is enabled in Preferences > Mobile Data Network
Data charges with your mobile carrier may apply. |
|
Use When Available |
Appears only on devices with mobile connectivity.
You can allow or disallow VoIP calls using a separate setting Settings > Preferences > Allow VoIP Calls. Data charges with your mobile carrier may apply. |
General
|
Field |
Description |
|
Improve Reachability |
|
|
Reachability Strategy |
|
|
Private When in Background |
|
Custom Colors
|
Field |
Description |
|
Select Your Colors |
Change the color for various parts of the screen and tap Apply Colors. Tap Reset Colors to easily return to the default settings. |
Call Handling
|
Field |
Description |
|
Native Integration - iPhone |
Appears on iPhones running iOS 10+. When on, SolSwitch Connect enables CallKit native call integration and users see the following differences:
|
Incoming Call
|
Field |
Description |
|
Play Ringtone |
Appears when Settings > Preferences > Native Integration is off.
|
|
Custom Ringtone |
Appears when Settings > Preferences > Native Integration is off.
|
|
Vibrate - iPhone |
Appears when Settings > Preferences > Native Integration is off.
|
|
Alert Answer |
Appears when Settings > Preferences > Native Integration is off. Controls the behavior of the incoming SolSwitch Connect call prompt (when SolSwitch Connect is in the background):
|
|
Alert Missed |
Controls the behavior of the missed call prompt (when you receive a call when SolSwitch Connect is in the background):
|
|
Ringtone |
The default ringtone for incoming calls. Played if no specific ringtone is assigned to the contact. Assign ringtones in native iOS contacts. |
|
Disable Call Waiting |
Controls whether call waiting is enabled or disabled.
|
|
Match Contacts for Caller ID |
Controls what name appears in Caller ID for an incoming call.
When Native Integration is enabled in Settings> Preferences – Call Handling, all numbers other than Softphone use the contact’s Display Name for the incoming caller ID if there is a matching contact. Once you answer the call, SolSwitch Connect uses the information in the SIP header for the Caller ID. |
|
Call Blocking |
Select what kind of phone numbers to block.
|
Outgoing Call
|
Field |
Description |
|
Turn Letter to Numbers |
Controls whether letters entered in the dial pad are converted to numbers.
|
|
Hide My Number |
Controls whether anonymous calling is enabled.
|
|
Default Account for History |
Changes SolSwitch Connect’s dialing behavior on History when multiple SIP accounts are configured in SolSwitch Connect.
|
Call in Progress
|
Field |
Description |
|
Background Image |
The background image that appears when you are on a call. Swipe the image to the left to delete it. |
|
Contact Image |
The background image that appears when you are on a call. Swipe the image to the left to delete it.
|
|
Auto Record Calls |
|
|
Mobile Call Interrupt - iPhone |
Appears when Settings > Preferences > Native Integration is off. When you receive a native call while already in a SolSwitch Connect call, the SolSwitch Connect call is put on hold. You will not be able to speak with the remote party in the SolSwitch Connect call until you answer or decline the incoming mobile call. SolSwitch Connect can play feedback to the person who is put on hold without any notice.
|
|
Play Music on Hold |
This setting controls music played locally by SolSwitch Connect; it does not control the server side if your service provider has ability to play music on the server side.
|
|
Play Tone on Network Lost |
|
Phone Number
|
Field |
Description |
|
Single Touch to Call |
When IM, SMS, and/or video are enabled, this setting is ignored. SolSwitch Connect displays a prompt to choose an option.
|
|
Show URI Domain |
|
|
Digits to Match |
Controls a number of digits in phone numbers SolSwitch Connect uses to match contacts. This aims to solve an issue where SolSwitch Connect matches a phone number with a different area code. |
Client-side Call Forwarding
|
Field |
Description |
|
Forward Calls |
This setting controls all the SIP accounts in SolSwitch Connect. If you have multiple SIP accounts and want to forward calls in only one of the SIP accounts, use the per-account call forwarding settings. When both global and per-account call forwarding settings are enabled, the global one takes precedence; all incoming calls on all the SIP accounts will be forwarded to a specified number. |
|
To Number |
Appears when Settings > Preferences > Forward Calls is on. Enter the number to which calls are forwarded. |
Messages
|
Field |
Description |
|
Enable IM & Presence |
|
|
Enabled SMS |
|
|
Alert Sound |
|
|
Alert Vibration |
|
|
Hyperlink Preview |
|
|
Private when Locked |
|
|
[Enter] as Newline |
|
|
Alert Text Tone |
The default text tone for incoming messages. Played if no specific text tone is assigned to the contact. Assign text tones in the native iOS contacts. |
Video Calls
|
Field |
Description |
|
Enable Video |
|
|
Send Landscape |
Appears when Settings > Preferences > Enable Video is on.
|
|
Video Quality Wi-Fi |
Appears when Settings > Preferences > Enable Video is on. The video quality for calls started on a Wi-Fi network. If you move to a mobile network during a call, the video quality retains this setting.
* Medium (VGA) and HD video are not supported on iPhone 4S. |
|
Video Quality Mobile |
Appears when Settings > Preferences > Enable Video is on. The video quality for calls started on a mobile network. If you move to a Wi-Fi network during a call, the video quality retains this setting.
* Medium (VGA) and HD video are not supported on iPhone 4S. |
CarPlay
When "Settings > Preferences > Native Integration" is on, SolSwitch Connect can be used with CarPlay-compatible vehicles.
- If Settings > Preferences > Improve Reachability is turned on, you may experience audio interruptions with audio sources other than your iOS device.
- If Settings > Preferences > Improve Reachability is turned off, CarPlay works with any audio source.
Requirements
- A car that supports Apple CarPlay
- Settings > Preferences > Native Integration turned on.
- A device connected to the car via a Lightning cable.
What You Can Do
With CarPlay, you can:
- Answer or decline incoming SolSwitch Connect calls via the CarPlay interface.
- Make outgoing calls through History on the CarPlay interface for calls that were made with SolSwitch Connect.
- Make outgoing calls using Siri.
- Hear the remote party over the vehicle’s sound system.
- Switch between the vehicle’s sound system (displayed as CarPlay on SolSwitch Connect), iPhone or iPad, and other Bluetooth.
- Control an established SolSwitch Connect call, such as mute, hold, add call, swap, merge and end.
Note: Video calls are not supported when CarPlay is used.
When native integration is disabled
When Settings > Preferences > Native Integration is off, connecting an iPhone to your car via a Lightning cable allows you to:
- Answer SolSwitch Connect incoming calls on the screen on your iPhone (instead of built-in screen in your car).
- Hear the remote party over the vehicle’s sound system.
- Use SolSwitch Connect on your iPhone to mute, end the call, etc.
Using Bluetooth to connect to a car
If you connect your device to your car using Bluetooth (instead of CarPlay), we recommend that you turn on Settings > Preferences > Native Integration so you can answer and hang up a call using car controls, such as buttons on the steering wheel, instead of tapping on SolSwitch Connect’s screen.
Using Bluetooth Headsets
When Settings > Preferences > Native Integration is on, you can answer and end a call by pressing a button on your Bluetooth device. However, if you are already on a call, be aware:
- Pressing once (or a short press) on the Bluetooth button performs End & Accept. This means that the original call ends and the new call begins.
- Pressing twice (or a long press) performs Hold & Accept. This means that the original call is put on hold and the new call begins.
|
Feature |
Dial Code |
|
Access Voicemail |
*98 |
|
Anonymous Calling |
*67 + Number |
|
Call Forwarding Enabled |
*72 + Number |
|
Call Forwarding Disabled |
*73 |
|
Park Call |
# # |
|
Answer Parked Call |
Dial lot number |
|
Extension Login |
*11 |
|
Extension Logout |
*12 |
|
Extension Login/Logout Toggle |
*904 |
|
Extension Status |
*13 |
|
Record Call (if purchased) |
#1 |